When it comes to collecting customer feedback, it’s easy to forgo customization and take a simple, one-size-fits-all approach to your surveys.
It’s especially true of when you have to send surveys to a ton of contacts in your database. After all, how much of a difference does a personal touch make when it comes to surveys?
Take it from us: It makes a big difference.
Not only will it provide a better experience for your customers (which reflects well on you), but they’ll also be more willing to respond to personalized surveys, giving you better, more accurate data to help you make your decisions.
The good news is that you can have the best of both worlds. SurveyMonkey makes collecting feedback an easy, set-it-and-forget-it process. Just follow these four simple steps and you’ll have wrangled your invitations into personalized messages in no time.
Uploading your contacts
Got a bunch of contacts you want to upload to your SurveyMonkey Account? The very first step you’ll want to take is to select Contacts from the dropdown menu that appears when you click on your username at the upper right-hand corner of the screen.
Think of this page as your contacts home base, which we’ll be using for pretty much everything we discuss in this blog. Use it to manage, update, organize, or import entire email contact lists to your SurveyMonkey account.
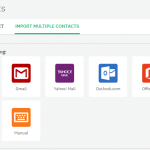
When it comes to importing contacts, you’ve got great deal of options: SurveyMonkey integrates with Gmail, Yahoo! Mail, LinkedIn, Office 365, or Outlook.com.
If you would rather import your contacts from another source, that’s also an option. All you need to do is load your contacts into a simple .csv file and select it as your upload option instead of an email client.

Finally, if your list is small enough, you always have the option of manually entering each contact you want on your list.
Managing groups
OK, now you’ve got a ton of contacts uploaded to your SurveyMonkey account, but how do you keep them neatly sorted? Easy! Organize them into groups.
Groups allow you to easily select the right customers without having to handpick them every time you send a survey. Organize them into groups once, and you’ll never have to do it again. Phew!
Remember, a contact can be a be a part of multiple groups, which really opens up your options for how you organize your contacts. For instance, you can make a new group for every new campaign you run over time without having to worry about whether you’re forgetting anyone.
Add a personal touch with custom data
At SurveyMonkey, we think of the surveys you send as conversations with your clients. What better way to have conversations than to personalize them to each client? This is where custom data comes in handy. Personalizing your survey can go way beyond just remembering their first and last name. Address, position, client ID—all these details can go a really long way when it comes to having direct and personalized conversations with your customers.
You can add up to 6 custom information fields to each contact from the Contacts page. Either click on an each individual email address to add custom data manually or upload a .csv file of your contacts that includes custom data if you’ve got a lot of customer profiles to update. Remember, it’s always worthwhile to keep your customer information up to date. You can use it to personalize your survey invitations (a proven way to get better response rates) or include it in your survey analysis to get a better view of your results.
Personalizing your design and email campaign
Did you know that you can personalize your survey design, too?
If your plan gives you access to our Advanced Piping feature, you can improve your respondent experience by greeting them with a customized message. All you need to do is pipe the data from contacts and watch your engagement rates soar!

Don’t forget to personalize your email invitations! When setting up your email invitation collector, add the groups you want to include to your email campaign and edit the message body to include your Custom Data tags. It’s sure to increase your survey response rates.
It’s hard to overstate how important it is to keep your customer contacts up to date in your SurveyMonkey account. Importing contacts and organizing them into neat groups makes sending survey invitations a breeze—even if you’ve got complex, overlapping campaigns.
Including custom data along with your contacts can really help personalize your invitations and even your surveys themselves, but it’s about more than that. Using custom data along with your contacts can dramatically increase your survey response and completion rates, which means you’ll hear from more of your customers and get better, more useful data.
Sounds good, right? Try using these tips in your own surveys to get game-changing information from your customers.


