Whether you’re a SurveyMonkey veteran, or brand new to using our platform, there are bound to be questions that come up when you’re creating, sending, or analyzing your survey.
Because we like to keep you in-the-know (and we’re driven by data) we’ve unearthed the top 5 frequently asked questions we get from you, dear customers.
1. How do I copy a survey?
Whether you’re updating the design so that you don’t lose any of your previous data, transferring your survey into another account, or to create multiple versions of a similar survey, there are any number of reasons you may want to copy your survey. This quick and easy process can be achieved in just a few clicks of your mouse:
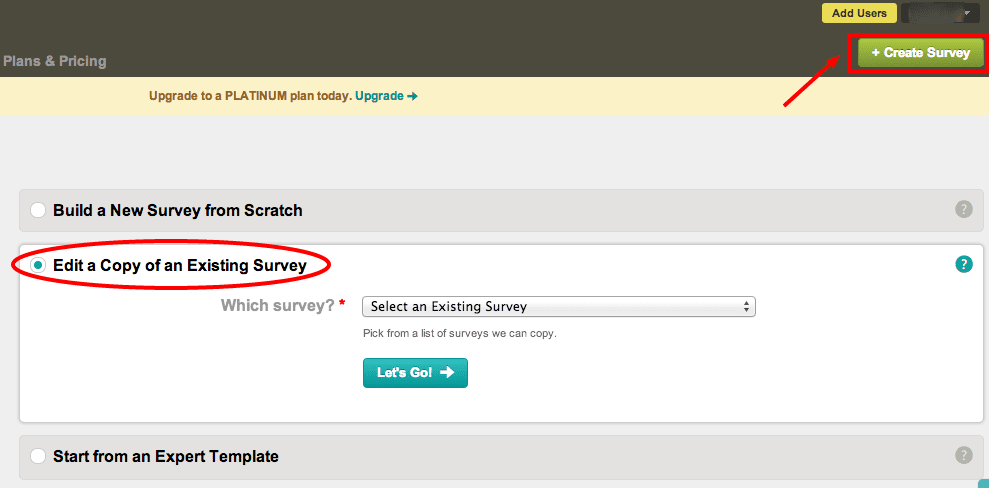
You’ll want to start by clicking the green Create New Survey button at the top right of your account. Next, choose the Copy an Existing survey option. Then, select the existing survey to copy, name the copy…and voila! You’ll have yourself a copy of your survey ready to go.
2. How do I add a Thank You Page?
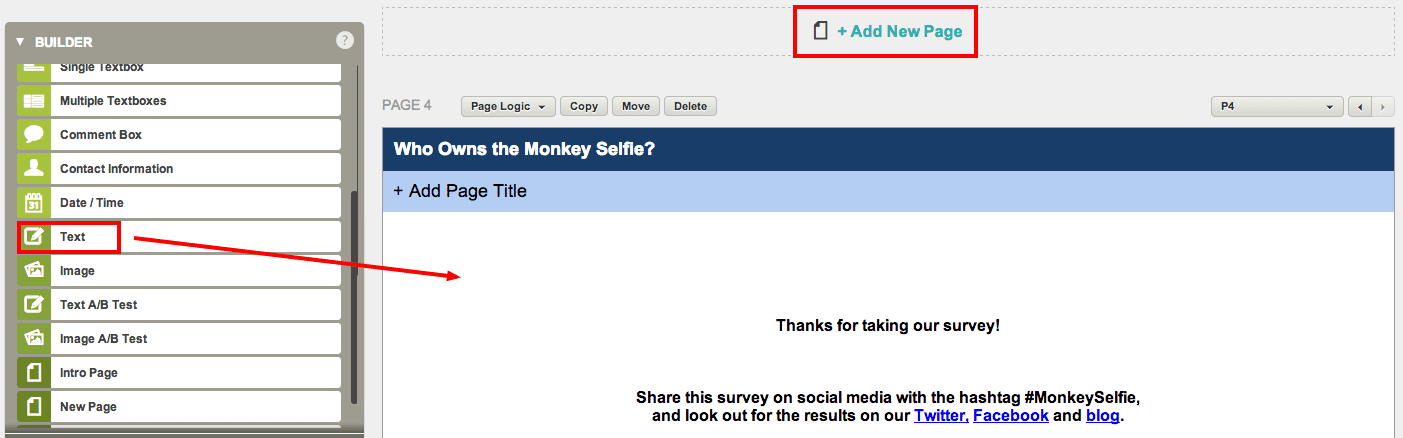
Adding a Thank You Page at the end of your survey can be such a great opportunity to not only show your appreciation to your respondents, but it also ensures your data’s been collected, and allows you to point your respondents back to your website if you’d like! We offer two ways of adding a Thank You Page:
1.) Add an End Page to your survey: If you prefer to keep your Thank You Page as part of the survey design, simply add a page to the end of the survey. Then add the Text question type to your survey, just like this:
2.) Collector Options: If you’d like your respondents to finish first, and then see your Thank You Page, then setting this up via your collector is the way to go! If you’re using a Web Link Collector, then click into the Show Advanced Options menu, choose the Thank You Page option, and insert your text. If you’re using any other response collection method, you’ll want to click into the Settings menu on the left hand side of the collector page. From here, scroll to the Thank You Page option, and insert your text.
3. How do I format the text in my survey?
We get a lot of questions on how to add some formatting flair to the text in your survey design. This is a great way to make the areas of importance in your design pop. In the past, this could be a bit cumbersome and some basic HTML was needed. With our updated design options, we’ve alleviated the HTML headache, and added our super handy enriched text editor:

This feature will allow you to use of a number of formatting options including bold, italicize, bullet points, hyperlinking and ability to change the font color, size and family. You can also add images and videos to questions from the editor. Give it a try–we bet you’ll feel like a fabulous formatter in no time!
4. Can I receive notifications when I get survey responses?
Who doesn’t get excited about receiving new survey responses?! With the release of our Survey Alerts feature, you’ll receive an automated summary of your incoming survey results each day. These alerts will be sent to the main email address registered to the account. Upon opening the email, you’ll see the survey title, the number of new responses, how long the collector has been open, and a link to take you directly to your account:

If for any reason you prefer not to receive these alerts, you can turn them off in the Survey Summary tab. We love this feature, and we hope you do too. Because let’s face it. When you hear that ding of your inbox and you find a sweet survey surprise as opposed to deadline reminder, it’s music to your ears!
5. How do I close my survey?
Once you have all the delectable data you need, you’ll want to close the collector so as to avoid any further responses stuffing up your analysis. If you know ahead of time when you want the survey to close, you can set up the collector to stop accepting responses on a specific date and time, or when a certain number of responses have been reached. These settings will be listed under the Advanced Settings option for the Web Link Collector, and under Change Restrictions for all other collector types:

If you prefer to close the collector at your leisure, just click on the Collect Responses tab, and then click the green Open link under the status section. You will be prompted with the option to set a custom message that the collector has been closed, or simply close the collector. You will then see that the collector shows a red Closed link next to the collector. If you ever decide to re-open this collector, simply click that red Closed link, and your collector will start gathering responses again! Read more about managing your collectors.
Now go forth, create, and send your surveys! From sending customer satisfaction surveys to measure customer loyalty to asking for patient and healthcare staff feedback, these tips are bound to help you become a survey-creating pro!
*Note: If you are using the classic version of Design, you can switch to our newer version of Design from your My Account section. You can also check out this helpful guide to learn how to use our latest version of Design.
Have more burning questions for us to answer? Give us a shout in the Comments below!