

SurveyMonkey provides you the tools to create a survey, collect responses, and analyze the data. Take your design experience a step further by using specific features to fine-tune your survey presentation. A clean design makes it easier for your respondents to navigate through your survey, know who you are, and understand what is expected of their answers.
You can create a standard design from scratch or use one of our templates. Once you have the initial draft created, enhance the look and functionality by using:
- Design options: edit comment box sizes, indent or add space, and use HTML.
- Validation options: require or validate responses and customize your error messages.
- Customization options: choose background colors, customize navigation button text, and add a progress bar.
This blog highlights step 4 of our 7-step checklist for creating a practical survey design.
Design Options
A. Edit Question Size and Placement
You have the ability to edit comment boxes, add spacing around questions, indent them, place them side by side, and control the amount of space reserved for the label and the answer choices. This is all accomplished under the Question Size and Placement feature inside the question editor. To learn more, check out the following topics in our Help Center:
B. Use HTML
If you wish to have specific parts of the survey stand out, use HTML to add elements like bold and underline. Simply type the code (or HTML tags) into places of the survey design where you can enter text for questions, page descriptions, answer choices, Email Invitation messages, and Thank You page collector settings.
To learn more about HTML and how to enable it in your account, visit the following: How to use HTML in SurveyMonkey.
Validation Options
A. Validate or Require Answers
Text Validation: Add a validation requirement to comment boxes to limit character types, text length, or require an email format. This can help you control how the comments are entered by respondents. To learn more, visit the following FAQ: Can I validate open-ended responses?
Required to Answer: You can make all questions mandatory by using the Require to Answer feature. This will require that all respondents answer the question before they can move onto the next page. An error message will appear if a respondent tries to skip a required question. To learn more, visit the following FAQ: How can I make questions mandatory?
B. Customize Error Messages
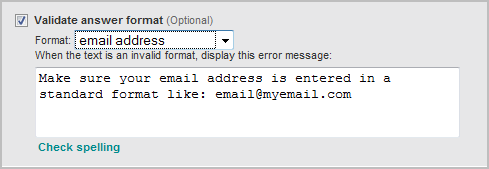
There are several places within the question editor where we provide a simple default error message. It’s a best practice to edit the error message based on the specific question when requiring a response or validating text.
For example, let’s say you create a question asking your respondent to enter an email address and set the Text Validation to must be an email address. If you leave the default error message stating the comment is invalid, your respondent may not understand what this means. It is best to edit the error message so your respondents know what is expected of the answer, such as:
Customization Options
Adding final touches to your overall survey design allows you to brand the design and polish the look. Simple customizations can make it easier for your respondents answer your survey:
- Customize the navigation buttons to move through each page.
- Add a progress bar so respondents can gauge their progress.
- Brand the survey’s theme, add your logo, etc.
For an embedded survey example of a design using all of these techniques, visit the first blog post in this series: 7 Practical Steps to Create an Effective SurveyMonkey Survey.
If you have best practices you rely on to create a polished survey or have questions on the tips in this post, let us know in the comments below.


